When working with business software like ERP, it is often necessary to interact with external systems. One powerful way to do this is through APIs. In this blog post, I’ll show you how to call API in Power Automate. The process is fairly simple, but it requires some time until you understand the logic.
Can I Call an API from Power Automate?
The obvious answer is YES, but first, you need to do some thinking about what are you trying to achieve by integrating with some external software. You also have to check the documentation of the API that you want to connect to, and understand how it works.
In my case, I had to connect to Rydoo – a travel expense management software – and insert new currency exchange rates. So, let’s see how it works!
How to Make an API Call from Power Automate?
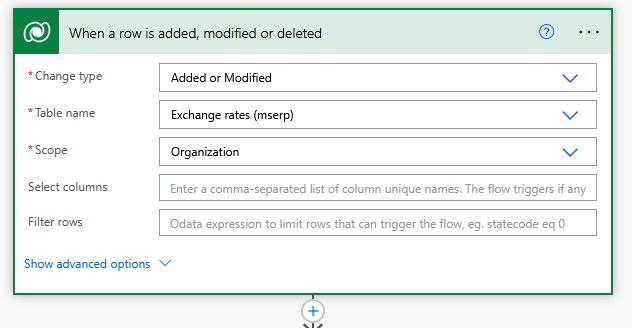
Trigger: When a Record is Added, Modified, or Deleted in Dataverse
The first thing I needed is the trigger that will start my flow. In my case, I have to trigger a flow when someone (user or batch job) adds a new currency exchange rate to a Dataverse table.
To kick off your flow, you’ll use the Dataverse trigger: When a row is added, modified or deleted.
- Choose the table you want to monitor
- Set the change type (create, update, delete, or all)
- Define any filtering scope, if needed
This trigger will launch your Power Automate flow every time a specified change occurs in Dataverse:
How to Call API in Power Automate?
In order to access the API, we must get the bearer token first. A bearer token is a type of access token that authorizes you to access protected resources in an API. It’s called a “bearer” token because whoever holds the token (the “bearer”) can use it to access the API. Once retrieved, you include it in the Authorization header of your HTTP requests. Bearer tokens typically have a limited lifetime and need to be refreshed periodically for continued access.
Getting the Bearer Token (Authentication)
Many APIs, like Rydoo’s, require OAuth 2.0 authentication. To call them, you first need to obtain a Bearer token.
Add an HTTP action to your flow and configure it as follows:
- Method: POST
- URI:
https://accounts.rydoo.com/connect/token - Headers:
Content-Type:application/x-www-form-urlencodedAccept:application/json
- Body:
grant_type=client_credentials&client_id=YOUR_CLIENT_ID&client_secret=YOUR_CLIENT_SECRET&scope=api
NOTE: You can probably generate the Client ID and Client Secret through the administration portal of the app that you are trying to connect to.
Here is how this looks in Power Automate:
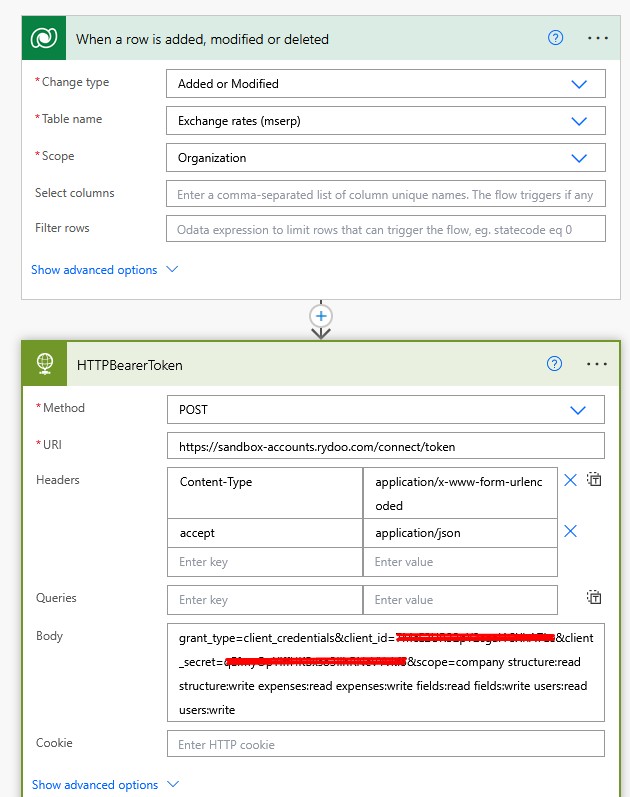
If the credentials and scope are correct, you’ll receive a response containing the bearer token.
Parsing the Bearer Token
Next, use the Parse JSON action to extract the access_token:
- Content: use the Body of the previous HTTP step
- Schema:
{ "type": "object", "properties": { "access_token": { "type": "string" }, "token_type": { "type": "string" }, "expires_in": { "type": "integer" } } }
Here is how it looks in my case:

This gives you a dynamic access_token that you’ll use in the next API call.
Listing Rows from Dataverse
Now that your flow is authenticated, use the List Rows Dataverse action to fetch relevant data:
- Choose the same or a related table
- Use OData filters if needed to limit the records
These results can be used to populate the body of your API request.
This is what it looks like in my example:
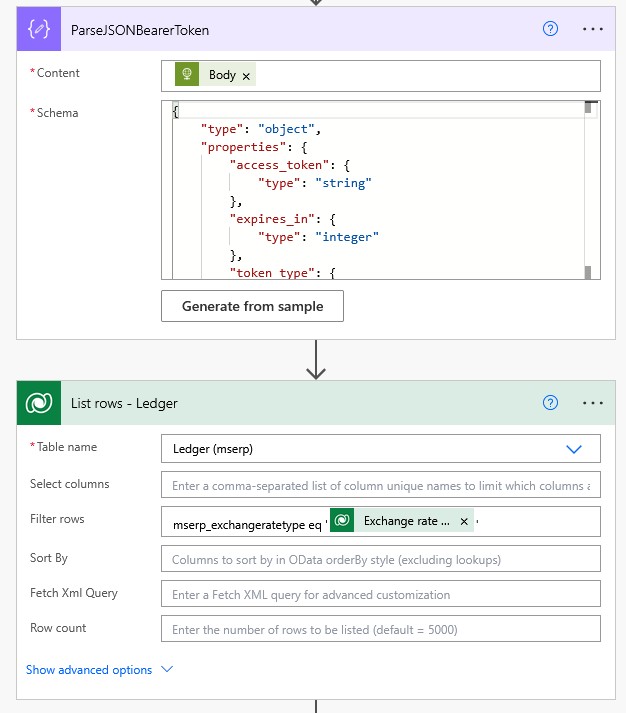
I will use the above table to populate some of the data in Rydoo.
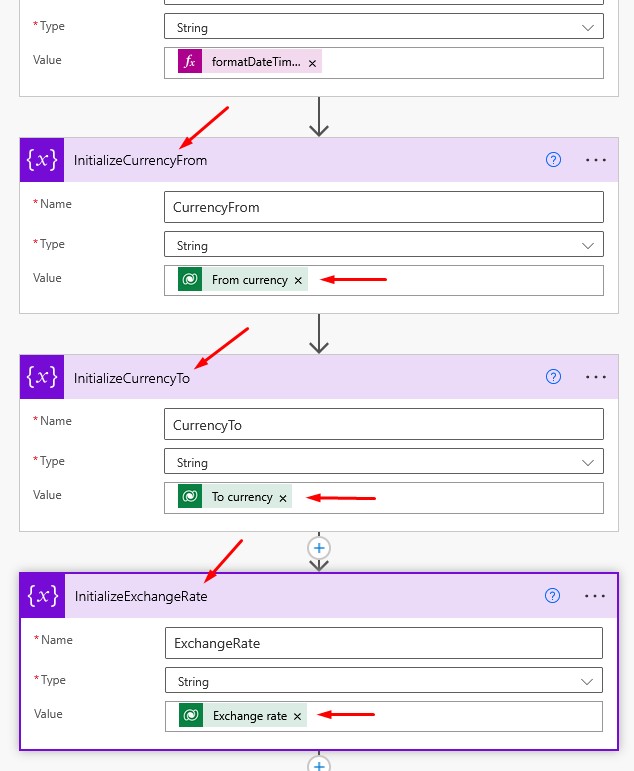
Initializing Variables
The next step is to prepare the rest of the data I have to POST into Rydoo.
branchIdstartDateexpirationDatecurrencyFromcurrencyToexchangeRate
Instead of this, you can build your own logic. It depends on which values from Dataverse you want to populate in your external app.
Here is what it looks like in my case:
If you need to convert a simple date like 2025-02-03 into an ISO 8601 datetime with time zone offset, use:
formatDateTime(variables('startDate'), 'yyyy-MM-ddTHH:mm:ss+02:00')
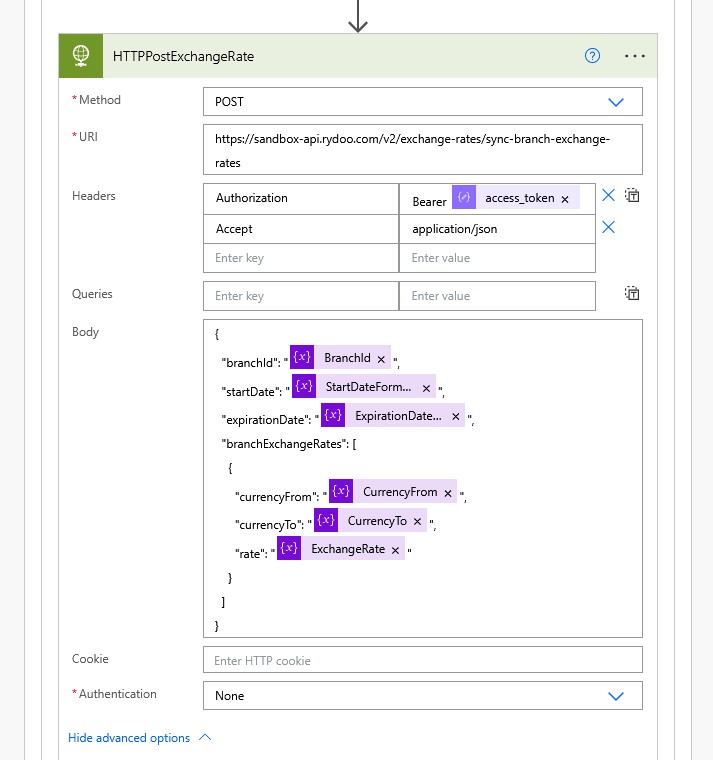
Calling the API Endpoint (POST Request)
After you have all the values that you want to send to your external software, add another HTTP action to send the final POST request:
- Method: POST
- URI: The API endpoint (e.g.,
https://sandbox-api.rydoo.com/v2/exchangerates) - Headers:
Authorization:Bearer @{body('Parse_JSON')?['access_token']}Content-Type:application/json
Body Example (replace with dynamic content as needed):
{
  "branchId": "@{variables('branchId')}",
  "startDate": "@{formatDateTime(variables('startDate'), 'yyyy-MM-ddTHH:mm:ss+02:00')}",
  "expirationDate": "@{variables('expirationDate')}",
  "branchExchangeRates": [
    {
      "currencyFrom": "@{variables('currencyFrom')}",
      "currencyTo": "@{variables('currencyTo')}",
      "rate": @{variables('exchangeRate')}
    }
  ]
}
Here is what it looks like in Power Automate:
This step answers a common question: How to make an API call from Power Automate?
Error Handling: Common Issues
Here are some common Power Automate API errors and how to fix them:
- 403 Forbidden: Check if your bearer token is valid and has permissions for the API endpoint.
- 401 Unauthorized: Incorrect client ID, secret, or expired token.
- Invalid_scope: Use the correct
scopewhen requesting your token (e.g.,api). - 400 Bad Request: The request body is malformed. Use
Peek codeto see the raw payload.
Always log responses using Compose or Scope blocks to help with troubleshooting.
Wrapping Up
In this post, you learned how to call API in Power Automate using a real-world example involving OAuth 2.0 authentication, bearer tokens, and dynamic data from Dataverse. Whether you need to work with Rydoo or any other external service, this method gives you the flexibility to securely and reliably integrate APIs into your Power Automate flows.
Looking to take it further? Try building error-handling branches or retry logic to make your flows production-ready.
If you want to learn more about Power Automate, make sure you check this link.
There is also a great book on Workflow Automation with Microsoft Power Automate.